NEW roster enablement on imported orders
Import orders can now support roster customization making it easier than ever to order your team's gear.
There are a couple of important steps to make sure your order is placed successfully.
Step 1: Enable order import & review process
Order import is not enabled on a store or account by default so you will need to request access to this feature if you don't yet have it. You can learn more about the basics of order import in this article.
Step 2: Create a roster & roster-enabled product
In order to create a product with roster customizations, your store must have at least one roster. However, this roster does not need to be complete. We recommend having at least one entry, just so you can easily visualize your customizations when building out your product.
Once you have a placeholder roster in your store, you can build your roster-enabled product(s).
Learn more about rosters and roster-enabled products here.
Step 3: Create your order CSV
When creating your order import CSV, you'll need to ensure the correct fields are used for the roster information to be accepted.
Basic order info
The primary order info required is represented by the following fields: Quantity (per line item), ShippingAddress_AddressLine1, ShippingAddress_AddressLine2 (optional), ShippingAddress_City, ShippingAddress_Name, ShippingAddress_Phone (optional), ShippingAddress_PostalCode, ShippingAddress_State.
Additionally, if you want to create more than one order within the same file, you can do so by using a unique CustomOrderId to represent each order.
Campaign Product ID
To import orders for your roster-enabled products, you'll need to find the CampaignProductID. You can do this by navigating to the product management page and copying the ID from the URL after "products/".

Color & size
For each order item, you'll need to specify the ProductColor and ProductSize. Accepted product colors and sizes will match what is visible in your live store listing.
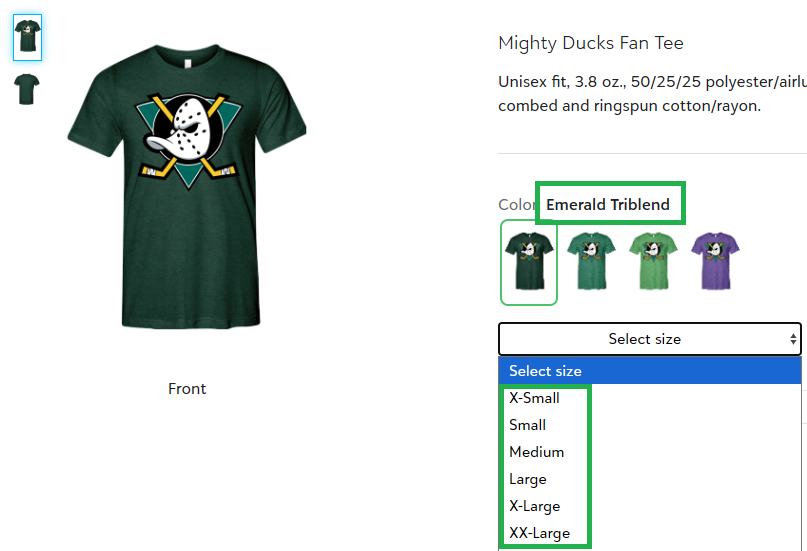
Alternatively, you can use ProductSKU in place of ProductColor and ProductSize.
Roster Info
Finally, roster information is added in the fields Customization_RosterField_JerseyName and Customization_RosterField_Number. These values will map to any customization areas on your product connected to those roster fields. This means, if you have both a front number and back number and both are connected to the number roster field, you only need to enter the number once in your CSV and it will sync to all set locations.
Step 4: Import your order CSV
Now that you've got your required information in the order CSV, upload it via the import orders function on your store management page, validate the file, and confirm the import. Within about a minute, you'll see the orders sync to your orders list!